

When it comes to a print design project, a lot of “technical stuff” comes into play that affects the design process.
Professional printers — even online printers such as Vista Print and Print Place — have different specifications for the final file preparation. If you don’t follow their instructions, you can end up with a final product that is off kilter, pixelated images, muted colors or even text that is cut off.
In short, printer specifications define the parameters of the actual electronic design file — the size, the fold, the color formulas, etc. — to ensure that you have the final product you want. If you are hiring a graphic designer, find out upfront if they will be working with printers to ensure your files meet the requirements of the printer. Otherwise, you’ll need to provide the graphic designer with these details.
Printer specifications are perhaps the most vital details Bragg Media’s graphic designers need when creating a project.
Which printer specifications do designers need?
Get social with us!
Like what you’re reading?
Subscribe to Bragg Media’s
monthly newsletter.
Print size and orientation (dimensions)
First, the most basic — and one of the most important details needed from the outset — includes the print size and orientation. This information should include the exact dimensions of the final print product and whether the orientation is portrait (vertical) or landscape (horizontal).
Unlike digital projects, which are often measured by pixels, print dimensions are measured by inches and depend on the type of product you are trying to create.
Typical Print Sizes
If you have a custom print project, the sizing can vary. However, in the graphic design industry, commonly used marketing collateral — such as brochures, fliers, envelopes, etc. — have standard print sizes. Here’s a look at the most common standard print sizes:
Flyer sizes:
- Letter size — 8.5” x 11” (portrait) or 11” x 8.5” (landscape)
- A5 — 8.3” x 5.8” (portrait) or 5.8” x 8.3” (landscape)
- A6 — 5.8” x 4.1” (portrait) or 4.1” x 5.8” (landscape)
- DL — 8.3” x 3.9” (portrait) or 3.9” x 8.3” (landscape)
Business cards:
The standard business card size is 3.5” x 2” — the perfect size to fit in a wallet. However, to stand out from the crowd, it’s common to see professionals carrying square business cards at 2.5” x 2.5” or even mini business cards at 2.75” x 1.10”.
Postcards:
Standard postcards (as defined by the U.S. Postal Service) must be rectangular. The most common sizes are 4” x 6”. But other standard sizes include:
- 4.25” x 5.5”
- 4.25” x 6”
You can also create “oversized postcards,” which are most commonly 5” x 7”, but can also be:
- 6” x 8”
- 5.5” x 8.5”
- 4” x 9”
- 6” x 9”
- 6” x 11”
Your postcard dimensions determine the price of mailing — and whether the USPS will even consider the item as a postcard. To be sent without an envelope, postcards must be between 3.5″ x 5″ and 6.125″ x 11.5″; and the paper they are printed on must be at least 0.007” but no more than 0.25” thick.
To qualify as a First-Class Mail postcard (your cheapest option), postcards should be between 3.5” x 5” and 4” x 6”; and between 0.007” and 0.016” thick. Oversized postcards (up to 6.125″ x 11.5″) will be charged at letter mailing prices.

Poster:
It’s not as easy to define a standard poster size, because it depends on where your poster will be displayed. Some examples include:
- 11” x 17” — known as the smallest poster size; great for indoor safety notices, event advertisements, or any other marketing need that can be displayed indoors and at eye level. This size is also referred to as “tabloid,” “ledger” or “ANSI B.” A bonus to this size? It can be mailed flat instead of rolled.
- 12” x 18” — very similar to the above sizing; also called a “mini poster.”
- 18” x 24” — this is perhaps the most “standard” poster size. It’s the typical poster size for framing, and it’s one of the most common sizes you’ll see for advertisement posters — both indoors and outdoors. These are also called “medium posters,” “Architectural C” prints or “½ size” prints.
- 24” x 36” — your standard “large poster” size. These are also pretty common both indoors and outdoors, and great for when you need an advertisement that will stand out in a busy area.
These are the most common sizes, but posters can go way bigger — like the kind you see in subways, at bus shelters or at airports.
Brochures:
Standard brochure sizes are very similar to flyer sizes — but the main difference is in the fold. Your sizes are:
- Letter — 8.5” x 11”
- DIN A4 — 8.3” x 11.7”
- Legal — 8.5” x 14”
- Memo — 5.5” x 8.5”
- Tabloid — 11” x 17”
- 9” x 12”
- 11” x 25.5”
See the similarities to the flyer sizes? But to be considered a brochure, it has to have folds. Which brings us to our next printer specification:
Fold Lines
Fold lines are a necessary printer specification for brochures and cards. And there are more options than you might think!
For the standard greeting card, you have the half-fold — which can be portrait orientation (letter) or landscape. The name makes this one pretty obviously; it’s just folding the paper in half, either vertically or horizontally.
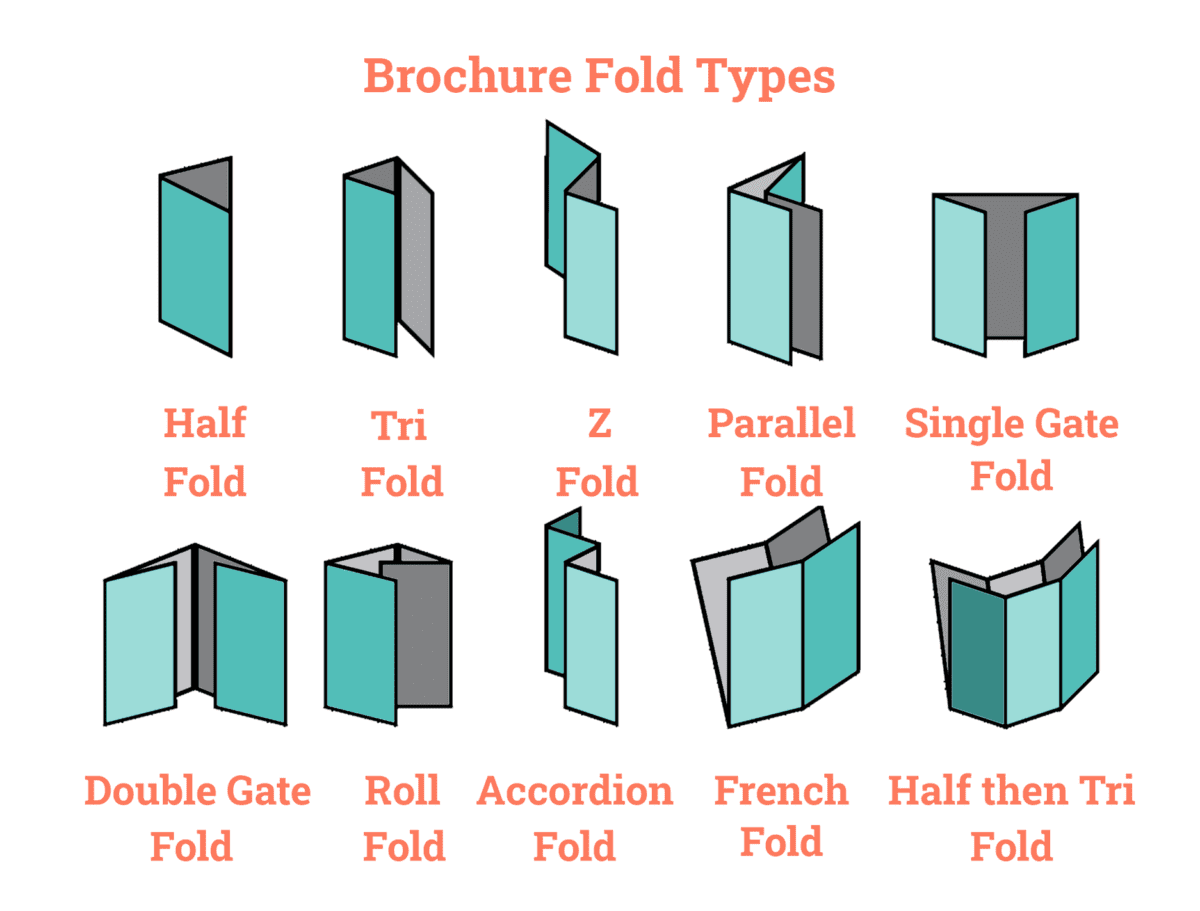
But brochures get a bit more complicated. Fold types include:
- Tri-fold
- Z-fold
- Single gate fold
- Double gate fold
- Accordion fold
- Parallel fold
- Roll fold
- Half + half fold
- Half + tri-fold
These fold styles depend on what kind of display you want to go for and how much information, text and photos you are trying to fit into your brochure. Depending on the style, the fold line can either serve as a distinct column or new “page” to your brochure — or the design could be a larger “spread” that goes across the entire length of the unfolded brochure (common with a z-fold design).
Now, at this point, you might be asking — how do you keep design elements from being lost in the printing process — especially with so many different options for sizing and fold lines?
Color Matching
If you’re new to the printing process, you’ve probably never heard of color matching. Essentially, what this means is that the color mode you use during your design process needs to match the color mode a printer uses. In digital projects, you use the RGB (Red Green Blue) color mode that is used in monitors, television screens, digital cameras and scanners; but printers use the CMYK (Cyan Magenta Yellow and Black) color mode. These are the colors used on the press in “4-color process printing,” also known as “full color printing” or “four color printing”.
If you create a digital design project in RGB color mode and later decide you want to turn it into a print project, you need to convert it to CMYK color before you print. Otherwise, your colors could end up looking different than what you saw on the screen. PrintingForLess.com recommends CMYK color builds that look a little lighter than what you want. “Be especially careful to keep backgrounds light if there is black or dark colored text over it, so that the text remains readable,” they warn in this article.
What you need to know about “bleed” margins
Everything in the design and printing process is dependent on margins and very specific measurements. In every type of print design, whether it’s a postcard, poster, brochure or flier, there is a “bleed zone.”
If your design includes color or images that go over the edge of the collateral piece, such as a flier, brochure or poster, then you also need to let your designer know the “bleed size.” If you don’t want white lines around your piece, then the designer must set the document up with bleeds. Typically, bleed refers to an extra 1/8” (.125 in) of image or color that extends beyond the trim area of a printing piece. Every printer is different and this number might change. To accommodate for bleed, a project is printed on an oversized sheet that is cut down to size so that the image is “bleeding” off the edge of the paper.
The designer needs this information upfront because it will affect how the entire project is laid out. They need to set the document to the correct size, set guides for: the trim, the final size of the produce; the safety area, the inner margin where all of the important information and graphic elements will live (typically ⅛ inch inside the edge); and any borders, which must be at least ¼ inch from the trim line or ⅜ inch from the bleed line.
If you don’t provide that information, the designer may have to start over, resulting in wasted time and money.

One-Time Graphic Design Support
Have 4-6 projects? We can help!
Paper Stock
When we talked about the thickness of a postcard, what we were really discussing is paper stock. This is the type of paper that your final product is printed on.
When choosing a paper stock, there are a few things you need to be cognizant of: weight/thickness and whether it’s coated or uncoated.
Paper weight/thickness is particularly important if you plan on mailing your printed product. The heavier the paper, the more you’ll pay in postage fees. At the same time, it’s important that your print product isn’t too thin/light with the paper stock. How thick you want your paper to be depends on what type of printed product it is — greeting cards, business cards, wedding invitations and table tents tend to be made from thicker cardstock.
The next factor — paper coating — affects both the feel of your printed product. Coated paper can be glossy or matte, and usually leads to a more vibrant printing job; it’s great for color-and image-heavy printed products. Posters, rack cards and brochures are often printed on coated paper because it looks crisp and sharp.
Uncoated paper is typically a little lighter, and can be better for text-heavy materials — the text can be easier to read, and they won’t get smudged from fingerprints as easily. Uncoated paper also is good for products that need to be written on, such as letterhead, envelopes, questionnaires or workbooks. Uncoated paper often exudes warmth and tactility — which implies friendliness, trust and authenticity.
 Website Design
Affordable website design with a process that works for you.